Stop Blaming Your Legs Right Now, Learn to Position Yourself!
In this post6 sections
How many times in a match have you felt “slow”? You see your opponent’s ball heading to one side and, no matter how fast you try to move, you don’t get there in time. You think: “I need to train my legs more.”
What if the problem isn’t your movement, but your positioning? In our view, what looks like “bad legs” is, most of the time, tactically wrong positioning.
Today, we’re going to dive into one of the most important tactical concepts in the game: the Coverage Axis. And we’ll explain why some players seem to “guess” where the ball is going.
TL;DR: a player who looks “slow” is usually badly positioned, not badly conditioned. First understand the zones of the table; then the Scattering Angle, the fan of replies that your own ball creates for your opponent. The Coverage Axis is the point of greatest efficiency to cover that fan, and it is not in the middle of the table: following the rule of 1/3 backhand and 2/3 forehand, it sits shifted toward the backhand side. At the end, there are two drills to make it automatic.
The basics: understanding ball placement
For a beginner, “ball placement” just means hitting the table. For a tactical player, the table is like a chessboard. The first step is to understand the zones. A side note here: this model is only a suggestion, we could create many others, and we’ll use this one because it is simpler.
We can divide your opponent’s side into three depths:
- Net zone: where short serves and drop shots land.
- Middle zone: a tactically risky area, because the ball is neither short enough to make things difficult nor long enough to push the opponent back.
- Baseline zone: the target area for fast, long balls, which put the opponent under time pressure.
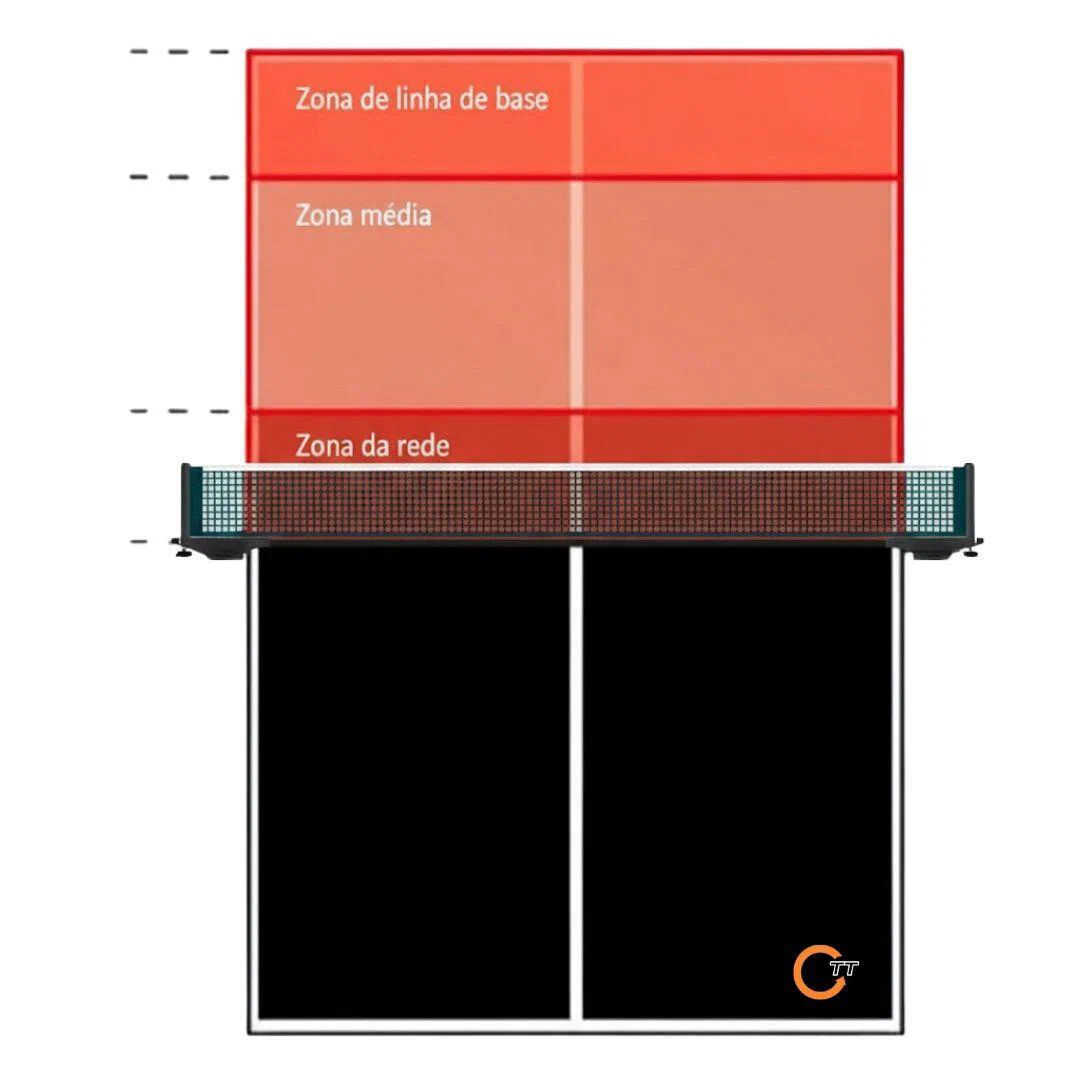
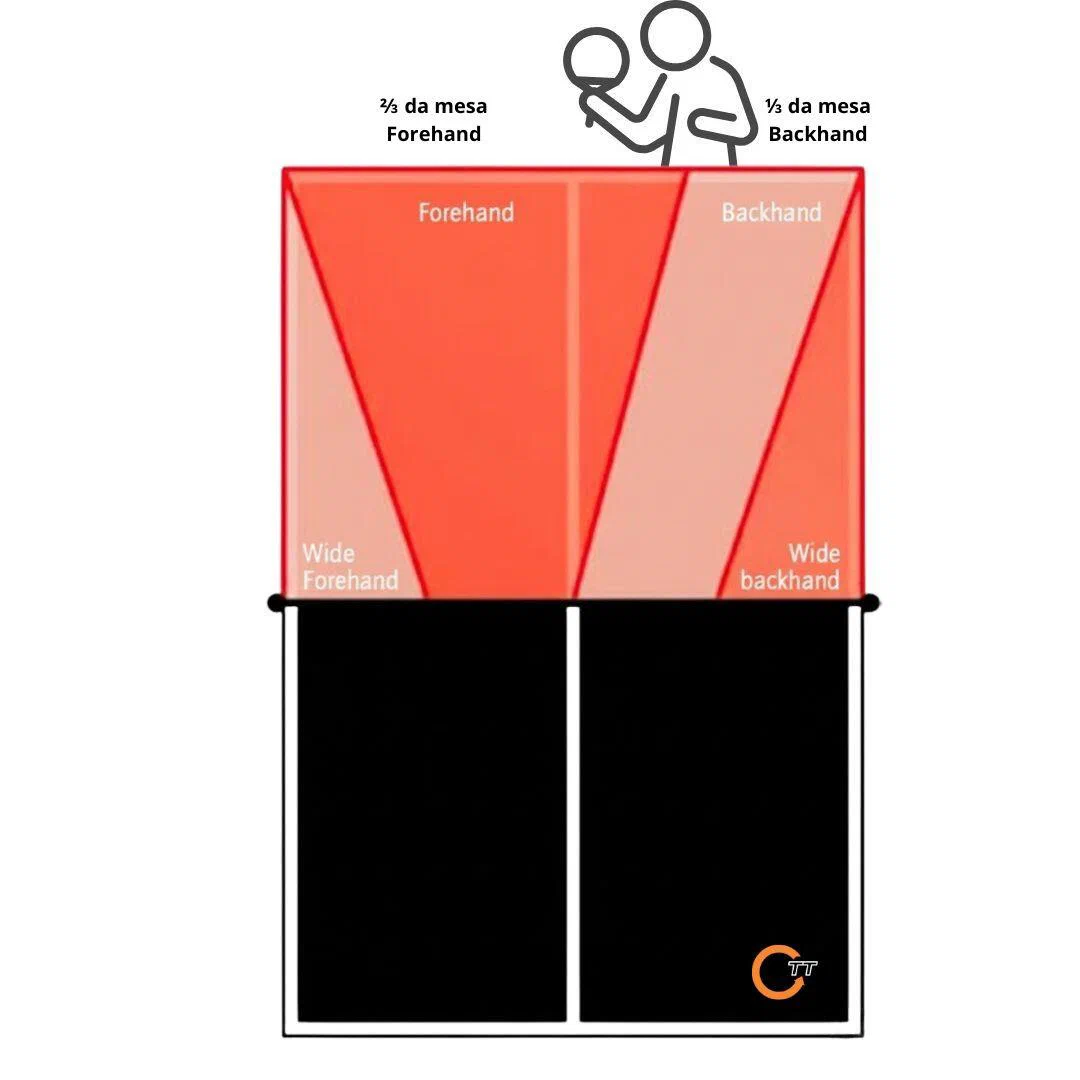
Besides depth, we have the side areas. The most common tactic is to aim at the “elbow”, that point of indecision where the player doesn’t know whether to use the forehand or the backhand. The other is to force the opponent into the “wide forehand” or the “wide backhand”, pulling them off the table to create an empty space.
That’s the basics. But true tactical mastery isn’t only in where you place the ball, but in where you position yourself afterward.
The basis of anticipation: the Scattering Angle
This is where we separate random players from tactical players. There is a key concept called the “Scattering Angle”.
What is it? Put simply, it is the “set” of all the probable angles your opponent can use to return the ball, based on the point where they are going to hit it on the table.
- Case 1: a ball to the middle. If you hit a ball to the middle of the table, your opponent’s Scattering Angle is more restricted. They can’t create very wide angles, which makes their return more predictable and less dangerous.
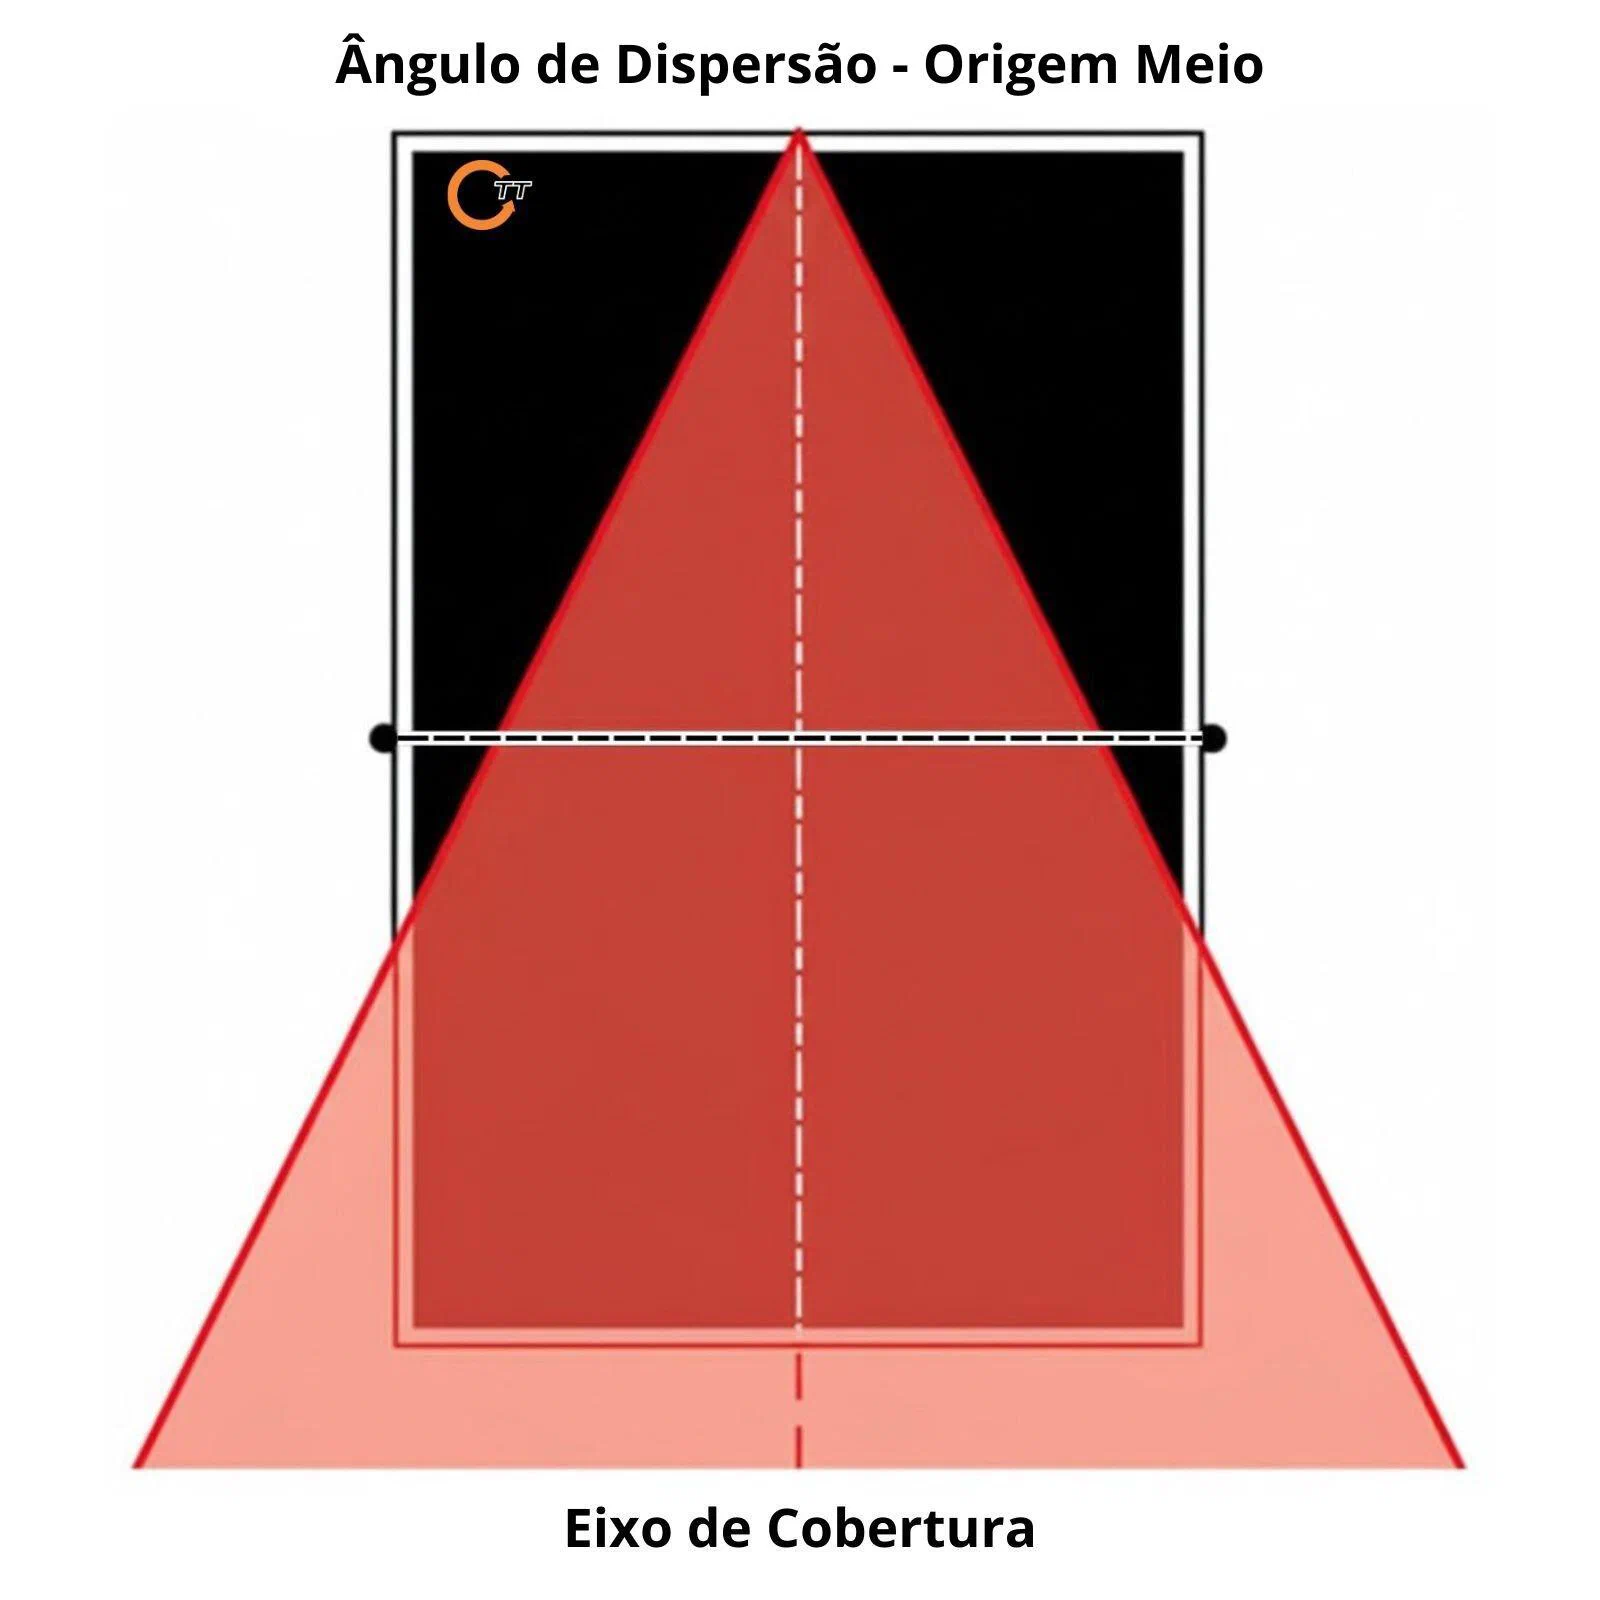
- Case 2: a ball to the backhand corner. If you hit a long ball to your opponent’s “wide backhand”, their Scattering Angle opens up more. Now they have the geometry on their side to play a deep down-the-line shot to your forehand OR a wide crosscourt shot to your backhand.
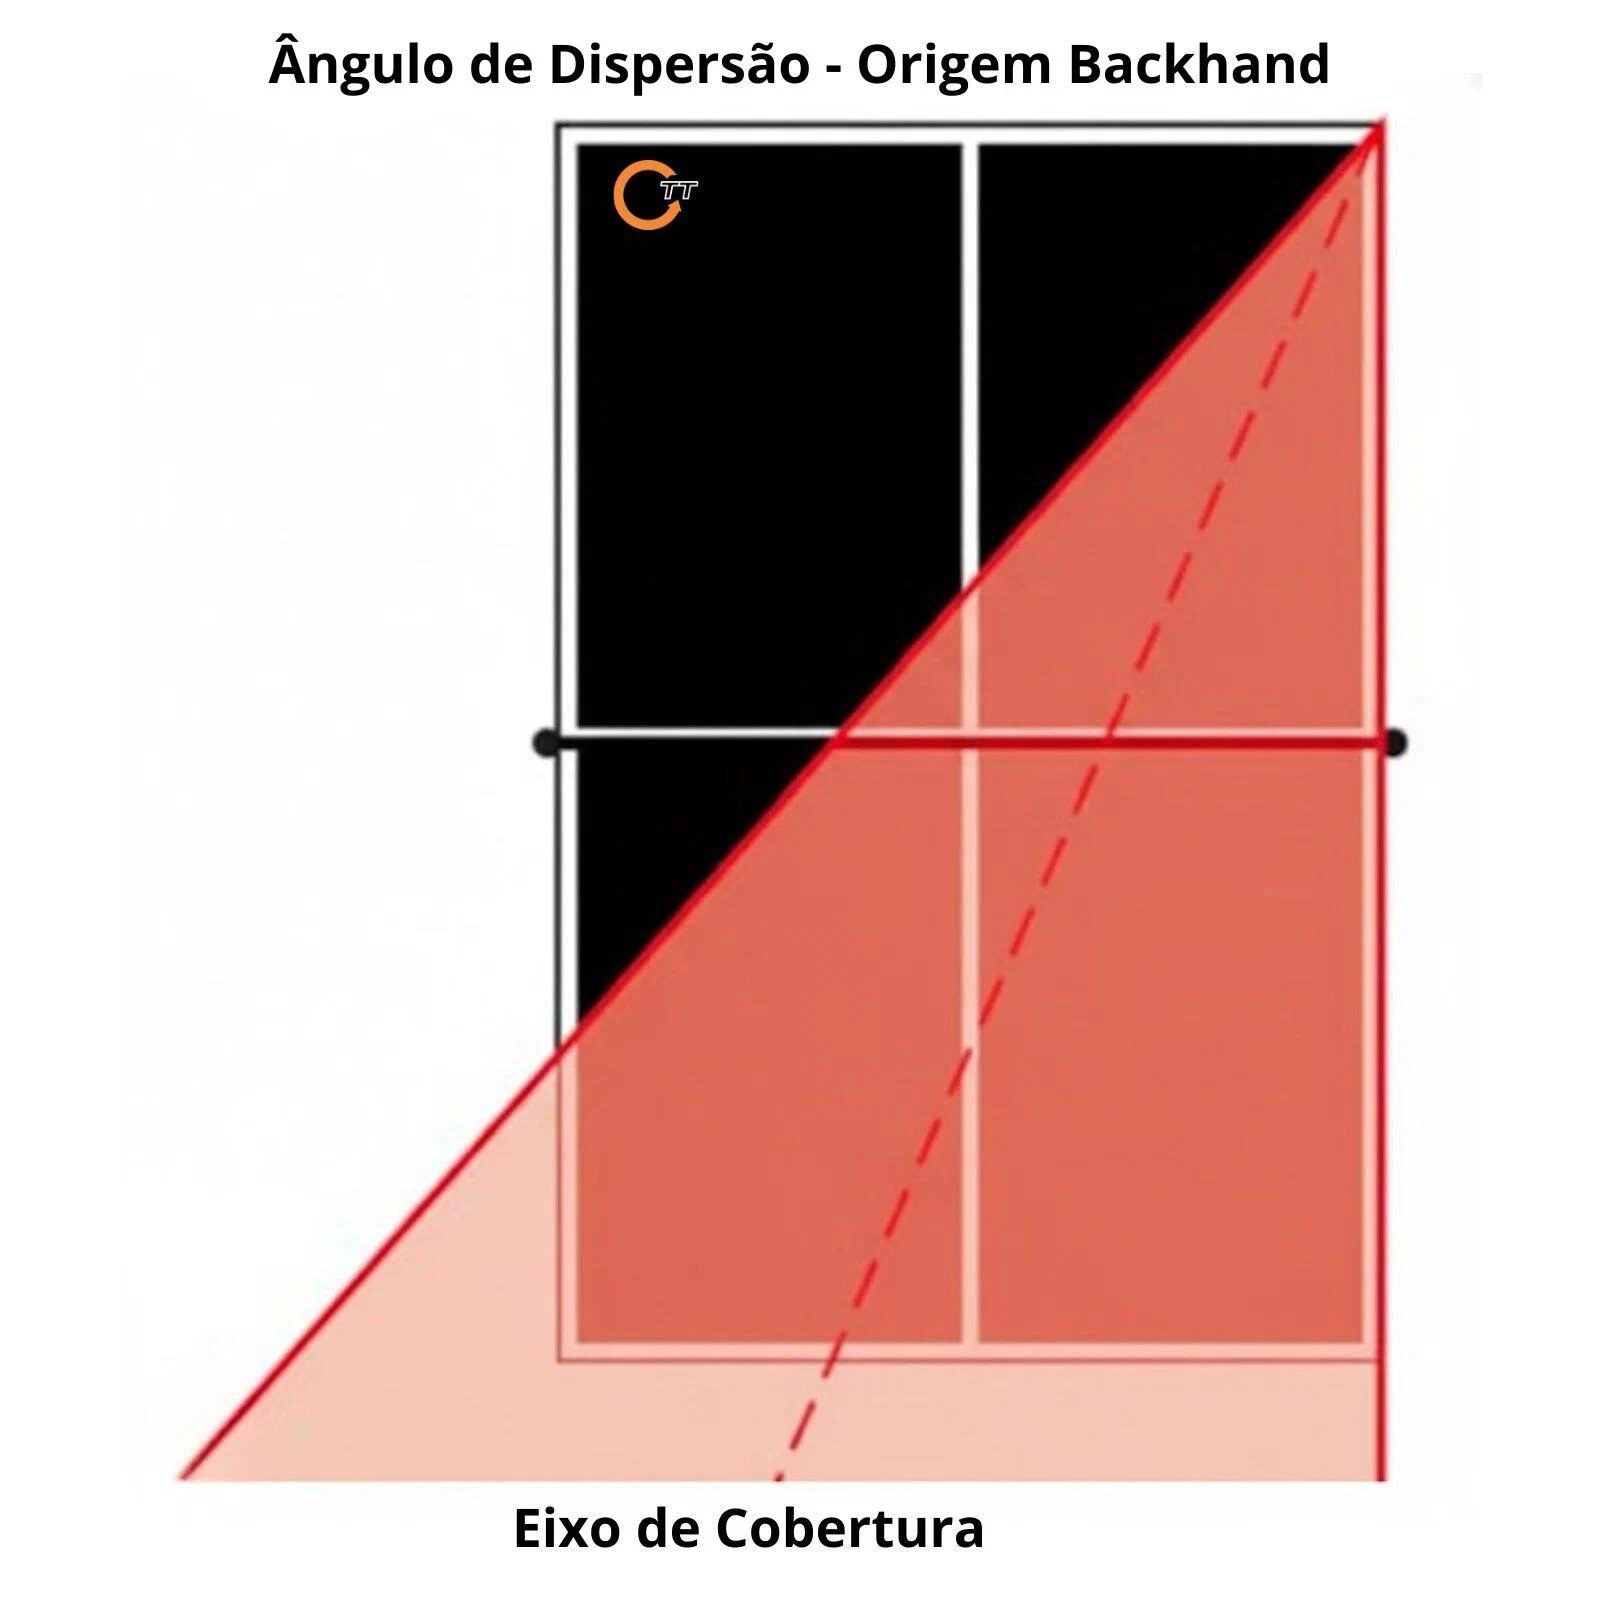
- Case 3: a ball to the forehand corner. If you hit a long ball to your opponent’s “wide forehand”, their Scattering Angle opens up more. Now they have the geometry on their side to play a deep down-the-line shot to your backhand OR a wide crosscourt shot to your forehand.
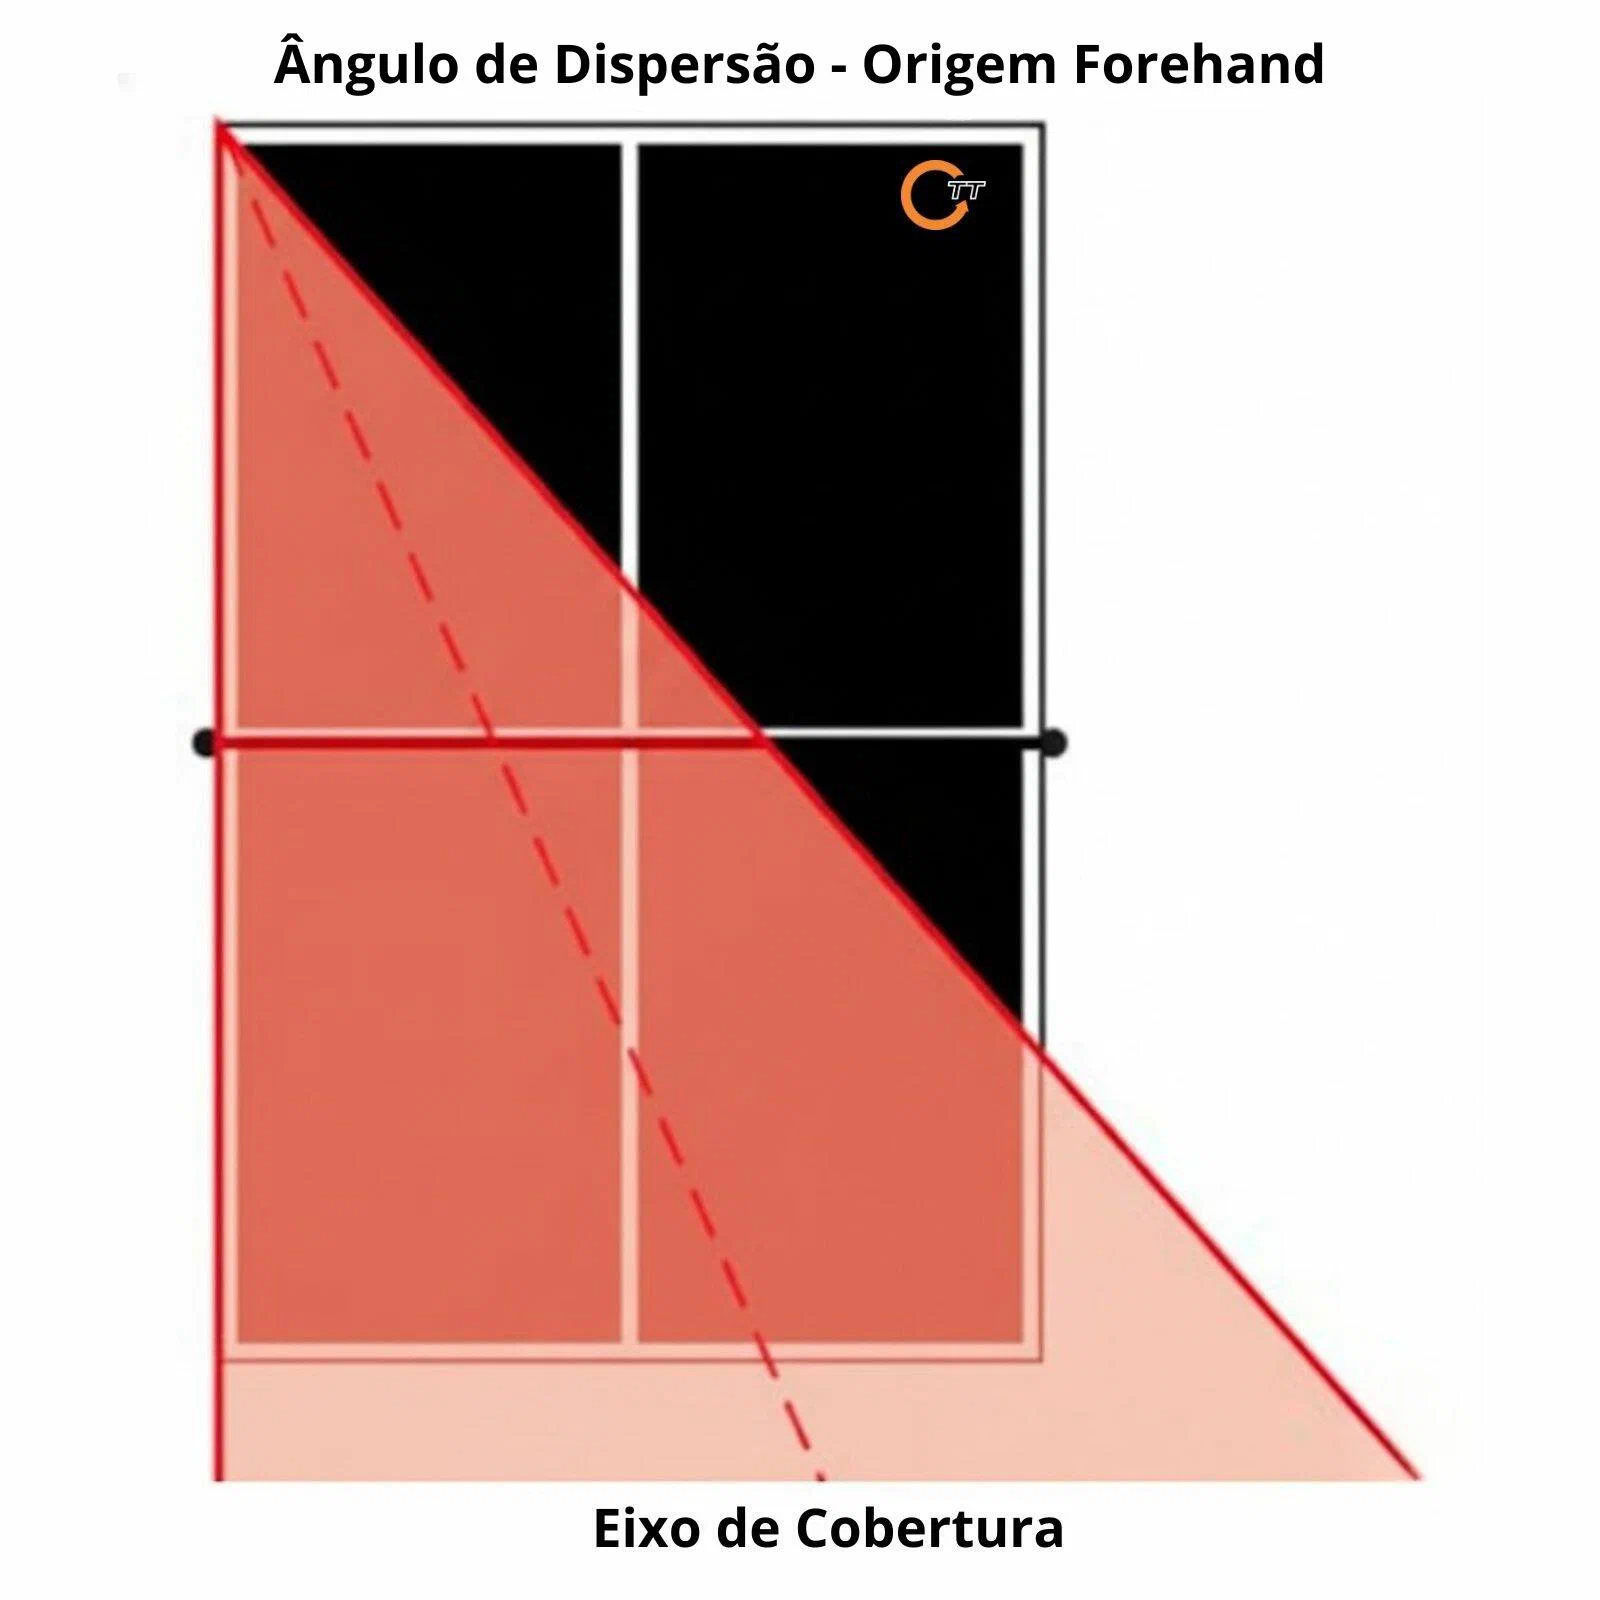
🤓 360TT technical insight
Does this mean that playing wide is a mistake? Absolutely not, but this tactic ONLY works if you know the consequence: you must move immediately to the Coverage Axis to anticipate the fan of replies that you yourself created.
It is crucial to understand: we are dealing with probability. A very skilled player (a genius like Waldner) can occasionally hit the ball outside that expected angle, “finding” an impossible point. But that is the exception, not the rule. Tactical play is about playing the probabilities.
Within that fan, the probability is not equal either. The chance of a ball coming crosscourt is always higher than down the line. The reason is simple: the diagonal of the table is longer than the sideline. The player has more “table” to land the ball and less risk of missing.
The secret: position yourself on the Coverage Axis
Tactical masters like Jan-Ove Waldner or Vladimir Samsonov look like magicians because they understand this geometry. They don’t try to cover the whole table; they move to the “Coverage Axis” based on where they placed the ball on the opponent’s side.
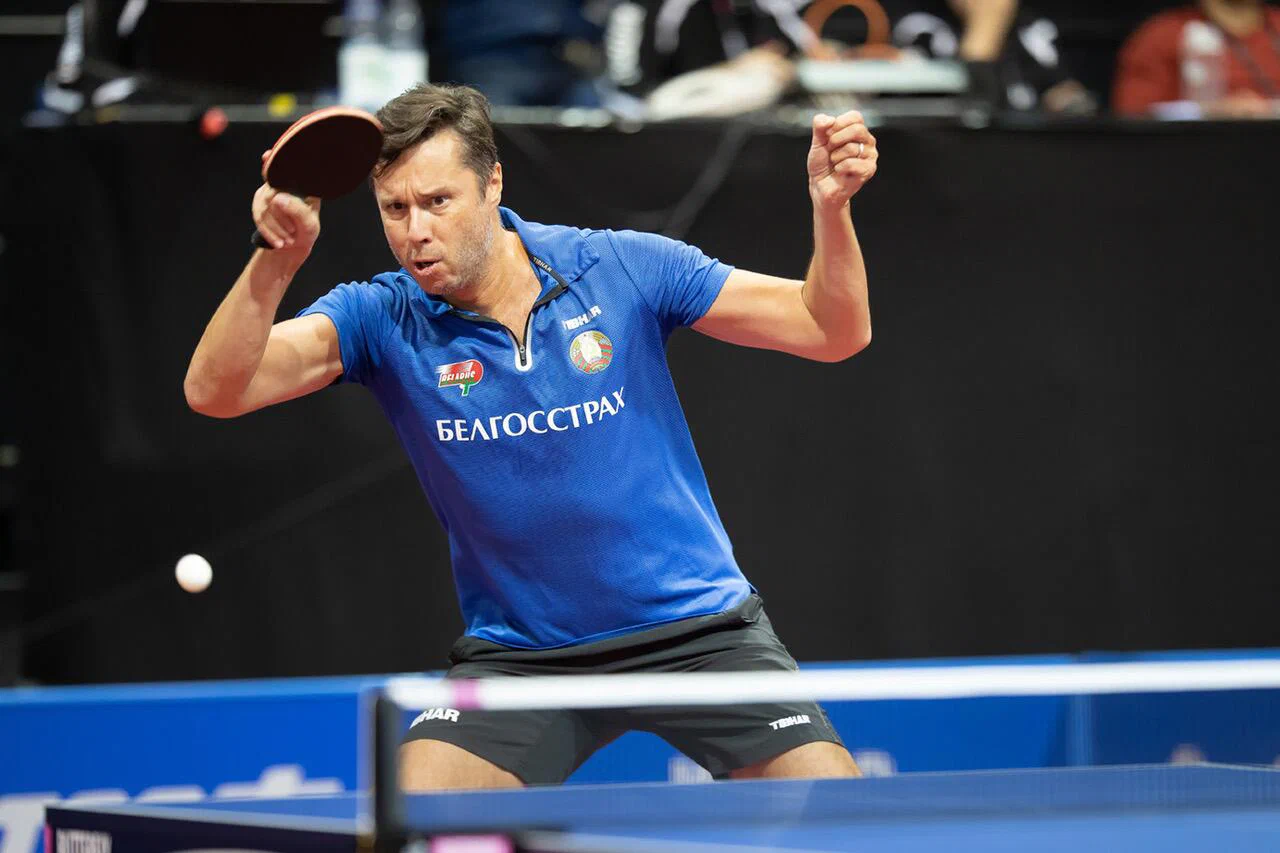
The Coverage Axis is the position of maximum tactical efficiency. It is the spot where you have the shortest reaction time for the largest number of probable balls from your opponent. And here is the trap many fall into: that spot is NOT the geometric center of the Scattering Angle.
360TT golden tip
Don’t waste time after your stroke just “watching” the ball to see if it hit the table. Instead, use the ball’s flight time to get ready. Watch where your ball is going to bounce and move immediately to your Coverage Axis, even before your opponent touches the ball. That is tactical anticipation.
The “middle” trap
The most common mistake is to think: “If my opponent’s Scattering Angle has a 100cm ‘fan’, I’ll stand in the middle, 50cm from each side.” That is a geometric trap, because it ignores the tool you use to play: your body.
The tactical truth is based on our biomechanics:
- The backhand is a stroke played in front of the body.
- The forehand is a stroke played to the side of the body.
Because of this anatomical difference, your forehand has much greater reach and coverage capacity. The true Coverage Axis, therefore, is a “shifted” position that compensates for this. It is the famous rule of 1/3 for the backhand and 2/3 for the forehand.
Let’s apply this to the practical example correctly:
- You hit a ball to your (right-handed) opponent’s “wide backhand”.
- Their Scattering Angle is now coming from that corner, opening a fan that goes from your forehand down-the-line shot to your backhand crosscourt shot.
- The mistake: positioning yourself at the geometric center (middle of the table). The most likely ball (crosscourt) will come to your backhand, forcing your weakest stroke (a backhand to the side of the body) or a bad displacement. The down-the-line ball (less likely) will demand a forehand closer to the body, reducing power.
- The right way (Coverage Axis): you apply the 1/3 - 2/3 rule and position yourself to the left of the center of the table (on your backhand side). Why?
- Covering the most likely ball (crosscourt): the most likely ball is the crosscourt one, which will come to your backhand corner. Positioned there, your backhand (your 1/3) is perfectly placed to “close the door” and hit that ball safely.
- Covering the least likely ball (down the line): the down-the-line ball, which is riskier for them, will come to your forehand corner. Your forehand (your 2/3) is the stroke with the greatest reach and mobility, making it the right tool to cover that greater distance.
- The threat (the pivot): by being positioned to the left (on the Coverage Axis), you also keep the threat of using your forehand (pivot) if they play the crosscourt ball slower or more toward the center.
Of course, there are exceptions. Players with a backhand-dominant style (like Iran’s Noshad Alamiyan) can invert this logic and cover 2/3 of the table with the backhand. But for the vast majority of offensive players, the 2/3 forehand rule is what defines the Coverage Axis.
The story behind Alamiyan’s style
Noshad Alamiyan’s “counter-intuitive” style (he is left-handed) of using the backhand to cover most of the table is not just a tactical preference, but a brilliant adaptation. In interviews, the athlete explained that he suffers from a neurological disorder that affects the nerves of his dominant hand.
This condition, which he says developed around 2016, keeps him from properly “feeling” the forehand stroke. Forced to change his game, he and his coach developed this unique style in which he relies entirely on the backhand (which he “feels”) to attack, and uses the forehand side (with its limitation) to serve, block or chop the ball, setting up the finish with the backhand.
Conclusion
For beginner and intermediate players, thinking about this consciously is the first step toward tactical progress. For an advanced player, this is no longer an option: it is a rule.
But if you consider yourself an “advanced” player and you are still constantly caught off guard down the line, or you live “run over” by the ball at the middle of the table (having to use the backhand where your forehand should be), maybe your “autopilot” needs a tactical recalibration. The problem, almost certainly, is not your legs. It is your positioning.
On this subject, we’d still have a lot to say. For example, how your distance from the table affects the Coverage Axis (the table grows as we move away) and the opponent gains double the time you gain to hit when you step back. The depth of your ball also matters, but this post would get much longer, so we’ll talk about that another time.
Training drills to automate the Coverage Axis
Drill 1: player A plays a crosscourt forehand topspin (right to right), player B blocks crosscourt. Whenever player A wants, they play the forehand topspin down the line (which changes the Scattering Angle) and immediately move to the Coverage Axis (racket at the center of the axis, 1/3 - 2/3 rule), and the point plays on freely.
Drill 2: player A plays a crosscourt topspin from the pivot position (forehand), player B blocks crosscourt. Whenever player A wants, they play topspin down the line and immediately move to the Coverage Axis, aiming to protect the forehand that is now open and easily reachable by player B, and the point plays on freely.
Now I want to hear from you: had you ever stopped to think about this? Do you play more by intuition or do you already calculate the Coverage Axis? Tell us in the comments!
footwork · slow feet · where to stand · court positioning · reading the ball · table tennis tactics · recovery position
Read also
Hurricane 8 on the Backhand: The Secret Weapon of Wang Chuqin and Sun Yingsha!
Discover why Sun Yingsha, Chen Meng and Wang Chuqin use the DHS Hurricane 8 on the backhand. See 360TT's technical take on the elite's new trend.
The Counterintuitive Tactic: The Power of the Long Serve at the Elite Level
The long serve is a counterintuitive tactic. See how elite players (Harimoto, Faraji) use this "bait" to set up the third-ball attack and win the point.
DHS Hurricane 3 NEO: The Guide to the World's Most Famous and Most Used Rubber
Commercial, Provincial, National or Player Edition? See what changes in the DHS Hurricane 3 NEO, which hardness to pick and how to avoid counterfeits.
Comments
Comment with your account (email or Google). Every comment is reviewed before it appears.